keebx: Hardware
Part of the keebx engineering log.
Principles
These pages are related to hardware principles that one should keep in mind when building a keyboard.
Prototyping
These pages describe the hardware _journey, _I’m using it as a diary to keep track of what I’m doing.
It’s not a tutorial or a specification, it’s just a transcript of my engineering tinkering process.
Each page talks about a specific component and how to make it “work”. Later, we will see how to integrate them all into a keyboard (if I ever make it that far!)
Prototyping
Keyboard PCB - Integrating everything
You’ve seen in the previous prototyping section how I tinkered with each component to understand how they work. It’s now time to move to the first version of the full-size keyboard PCB. In this first iteration, I won’t try to integrate everything. I’ll focus on basic keyboard functions, with the addition of the display.
Here is the main ressource I’ll be using:
Layout
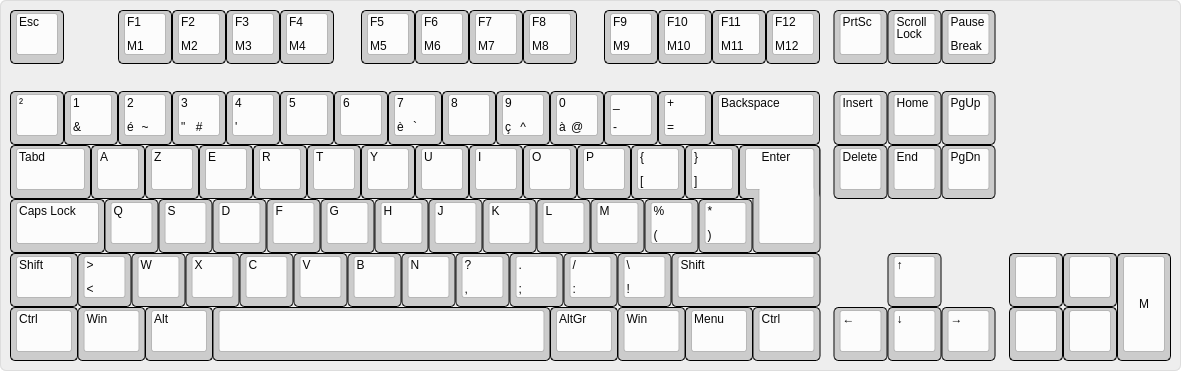
The layout can be seen below. Function keys are also macro keys, the macro layer can be selected using the bottom-right Macro key.
This layout is developer-oriented, with easy access to commonly used symbols in software development.
The 4 blank keys on the right will be used to interact with the keyboard menu / screen, or to select a user-defined layer.
Keep in mind that this is a layout I made for me and what I’ll use to make the first keebx keyboard. A keebx keyboard can take any form you want.